
With Custom Seas, you decide how your next sailing session plays out. Set rules, spawn treasure, summon creatures, manage crews, and shape your time on the sea into anything from a laid-back hangout to a full competitive game mode with its own scoreboard!
What is Custom Seas?
Custom Seas lets you create and host your own Sea of Thieves session with control over almost every aspect of the sandbox. Instead of loading into the standard Adventure Mode, you build a session around the experience you want and can invite up to 24 players across six crews to sail with you.
As the host, you are the Session Owner and will have access to a wide range of settings to create and manage your session. You can set Switches to change how players, ships, creatures, and World Events behave. Or you can load a Preset to drop into a prebuilt experience.
You can also enable Custom Scoring to run competitive matches with a live Scoreboard, capture your best moments with the Free Camera, and even host your session in unique locations you won’t find anywhere else in Adventure mode.
Once you’ve set sail in your customized session, you can use the Command Menu or Quick Commands to spawn treasure, fast-travel around the map, and trigger World Events on demand.
As you can create your very own experiences, you cannot earn any progression in Custom Seas. So during a Custom Seas session, you won’t earn Gold, Doubloons, Reputation, or Renown. The Silver you earn in a scored match is just for that session and doesn’t carry over once the session ends. You also can’t spend Silver on anything.
Custom Seas is available to every pirate!
How to Create and Host a Custom Seas Session
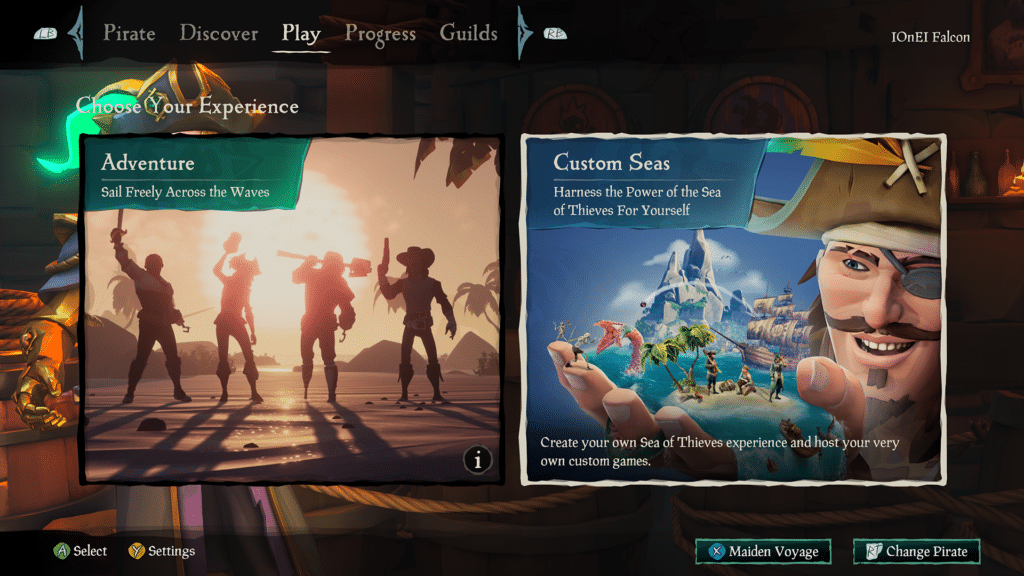
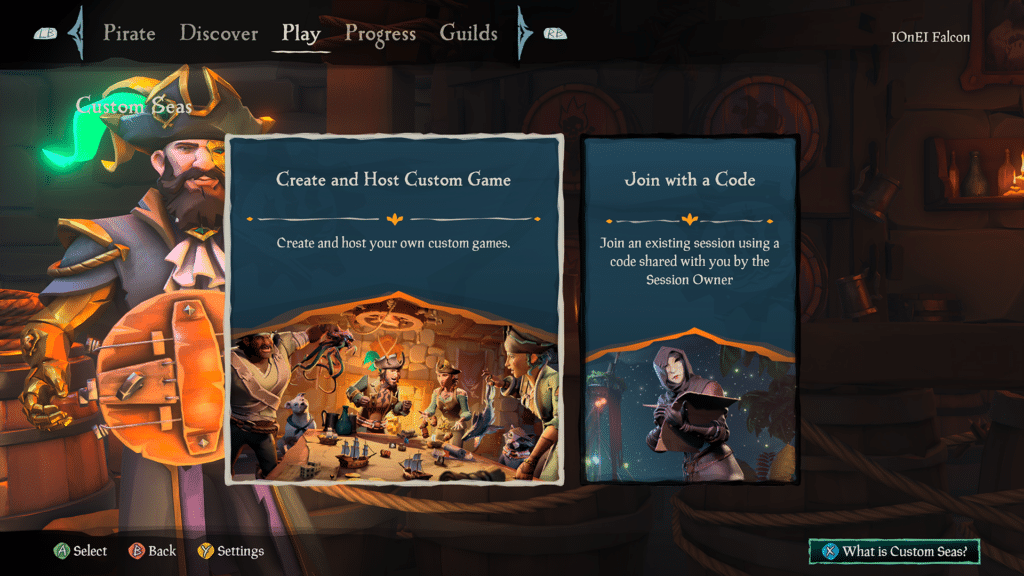
To start a Custom Seas session, select Custom Seas when choosing your experience. From here, you’ll see two options: Create and Host Custom Game to build your own session, or Join with a Code to drop into someone else’s.
Select Create and Host Custom Game, and then you’ll be prompted to Choose a Preset. You can choose one of the five official Presets or one of your own Presets. The official Presets, each with their own playstyle, are:
- Adventure
- Competitive Pirates
- Competitive Sandbox
- Creative
- Social
Whichever you choose is only a foundation of your session, as Presets can be modified once selected.
Picking a Preset takes you to Session Setup, where you can customize your session before sailing. Whoever creates the session becomes the Session Owner and can Edit Role Permissions, Change Presets, Edit Session Switches, Choose Location, and Edit Ships and Crews.
You can also bring other pirates into your session during Session Setup, either directly by inviting them or by sharing your Join Code. You can have up to 6 ships and 24 players in a single Custom Seas session.
Once you have configured your session to your liking, select Set Sail.
Session Roles and Permissions
Session Roles are the roles every pirate has in a Custom Seas session, and they decide who can use which tools. As the Session Owner, you control it all.
The three Session Seas roles are:
- Session Owner: The player who created the session. The Owner has access to every tool and permission, and no one can take them away.
- Session Leader: A trusted role the Owner can promote players to, granting access to more of the session’s features.
- Session Pirate: The default role assigned to everyone else when they join.
How to change a player's role
Only the Session Owner can change a player’s role. Select another player from the Session Overview to open their Player Options, where you can Change Role, View Profile, or Remove Player From Lobby.
Choosing Change Role promotes a Session Pirate to Session Leader, or moves a Session Leader back down to Session Pirate. You will get a prompt confirming your choice before the change takes effect.
Editing role permissions
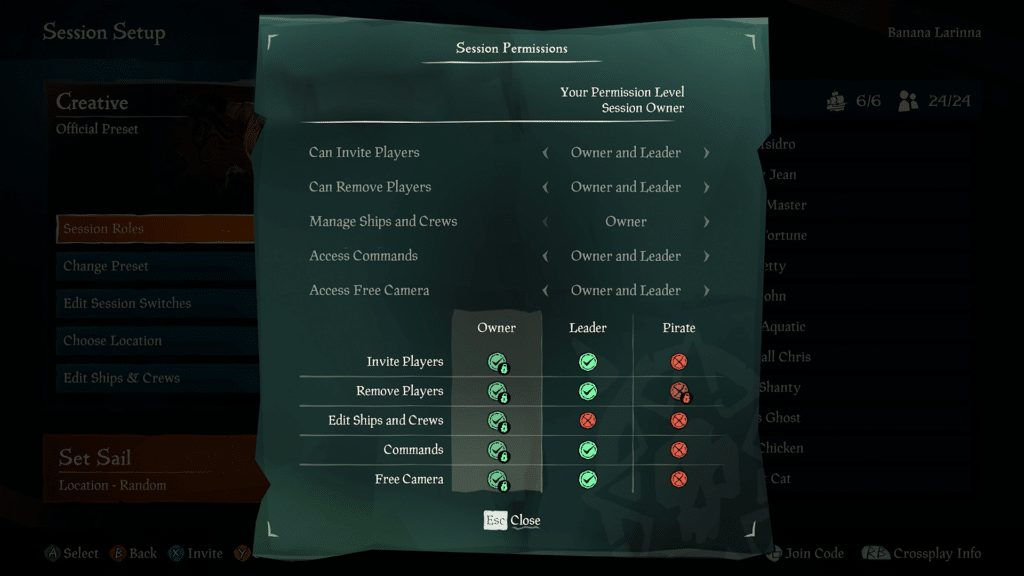
Select Edit Role Permissions from Session Setup to open the Session Permissions screen, where you decide which roles can use each of the session’s key features. There are five permissions to set:
- Can Invite Players
- Can Remove Players
- Manage Ships and Crews
- Access Commands
- Access Free Camera
You can set each permission to one of three access levels: Owner, Owner and Leader, or Everyone. Setting Can Invite Players to Everyone, for example, lets even Session Pirates send invites, while setting it to Owner locks it down to just you.
The Session Owner always retains all permissions, as shown by the locked icons in the Owner column. You can never accidentally lock yourself out. Session Pirates also can’t be given the ability to remove other players, which stays locked no matter which access level you pick. Once everything is how you want it, confirm with Apply Changes and Close.
Inviting Players and Join Codes
A Custom Seas session holds up to 24 players, so once you’ve created your session, it’s time to bring your crew aboard. There are two ways to invite pirates to your session, and both are available right from Session Setup.
The first is a direct invite. Select Invite Friends to pull up your friends list and invite players straight through your platform.
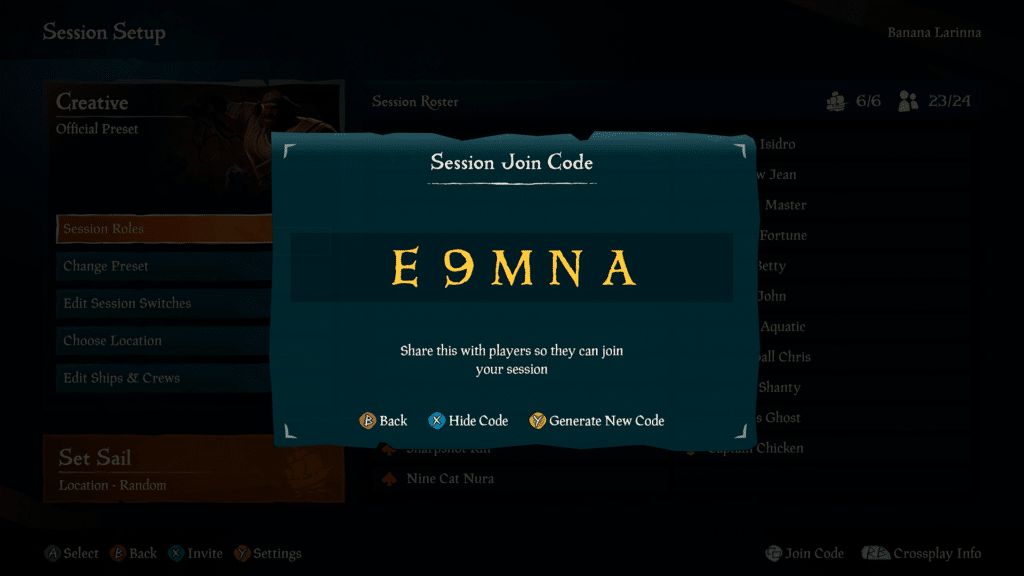
The second is the Join Code. Every Custom Seas session has its own unique code, which you can pull up at any time with Show Join Code. The code stays hidden until you select Reveal Code, and you can hide it again or select Generate New Code to swap it for a fresh one, which is handy if you want to stop new pirates from joining with an old code.
Share the code with anyone you want in your session, and they can join by selecting Join with a Code after choosing Custom Seas and entering it. The Join Code is the easiest way to bring in players who aren’t on your friends list.
Once your pirates have joined, they’ll appear in the Session Overview, ready to be sorted into crews and assigned ships.
Editing Ships and Crews
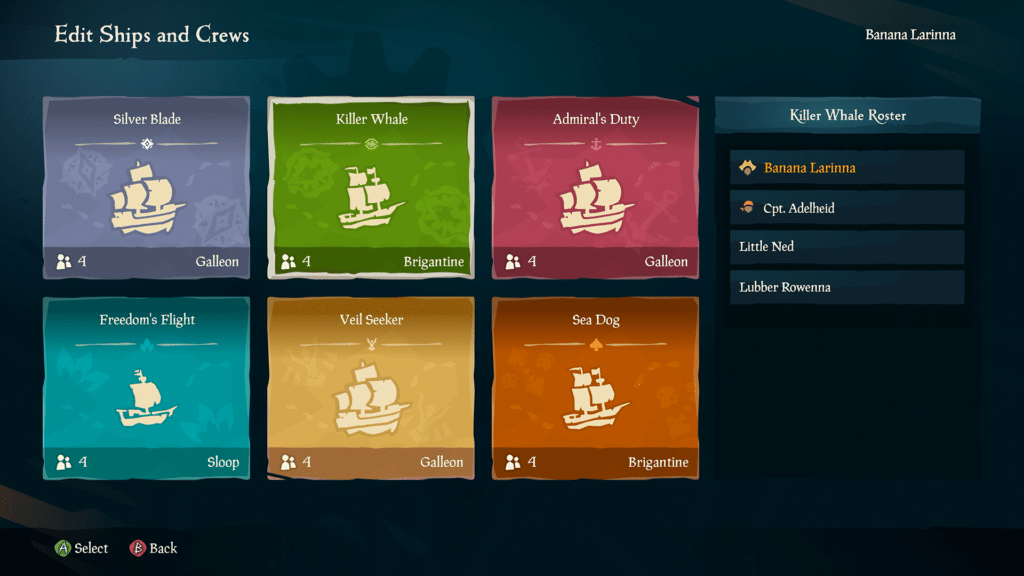
Custom Seas lets you decide which ships are in your session and which crews your players sail with. Select Edit Ships and Crews from Session Setup to open the crew roster, where you arrange everything.
Each ship in your session is its own crew with a crew name, ship type, and the number of pirates assigned to it. Selecting a ship brings up that crew’s roster on the right, listing every pirate aboard. You can have up to 6 ships in a single session.
To add a new ship and crew, select Add Ship and choose Add Galleon, Add Brigantine, or Add Sloop.
Selecting an existing ship opens its Ship Options, where you have four choices:
- Assign Players: Open a list of every pirate in the session and pick who to move onto this ship.
- Invite to This Ship: Send an invite that drops a player straight onto this ship when they join.
- Change Ship: Swap this crew’s ship between Sloop, Brigantine, and Galleon.
- Remove Ship: Delete the ship, as long as no one is on that crew.
A big difference in Custom Seas is that the standard crew size limits are gone. Normally, a Sloop can only have two players, a Brigantine three, and a Galleon four. In Custom Seas, you can assign any number of players to a single ship. So, you can add all 24 players onto one Sloop or split everyone across six ships.
You can edit ships and crews here in Session Setup before you sail, and again later from the Command Menu once you’re in the session, so you’re never locked into your setup.
Choosing a Preset
A Preset is a predefined set of rules that gives your session a starting point. After you select Create and Host Custom Game, the Choose a Preset screen appears first, and you’ll need to pick a Preset before you reach Session Setup. Don’t worry! You’re not locked into the Preset’s settings, as you can modify any Preset once you’ve selected it.
There are two groups of Presets: Official Presets and My Presets.
Official Presets
There are five official Presets, each one a different starting point for your session:
- Adventure: A selection of Switches that set your session up to mimic the official Sea of Thieves experience.
- Competitive Pirates: A selection of Switches that set up your session as a competitive mode with a focus on crew and ship battles.
- Competitive Sandbox: A selection of Switches that set up your session as a competitive mode with a focus on defeating creatures and completing World Events.
- Creative: Most Switches are disabled, giving you the perfect foundation to quickly create and customize your experience the way you want.
- Social: A selection of Switches that set up your session with a focus on social and roleplay experiences.
Selecting any Preset shows a short description on the right so you know what you’re getting before you commit.
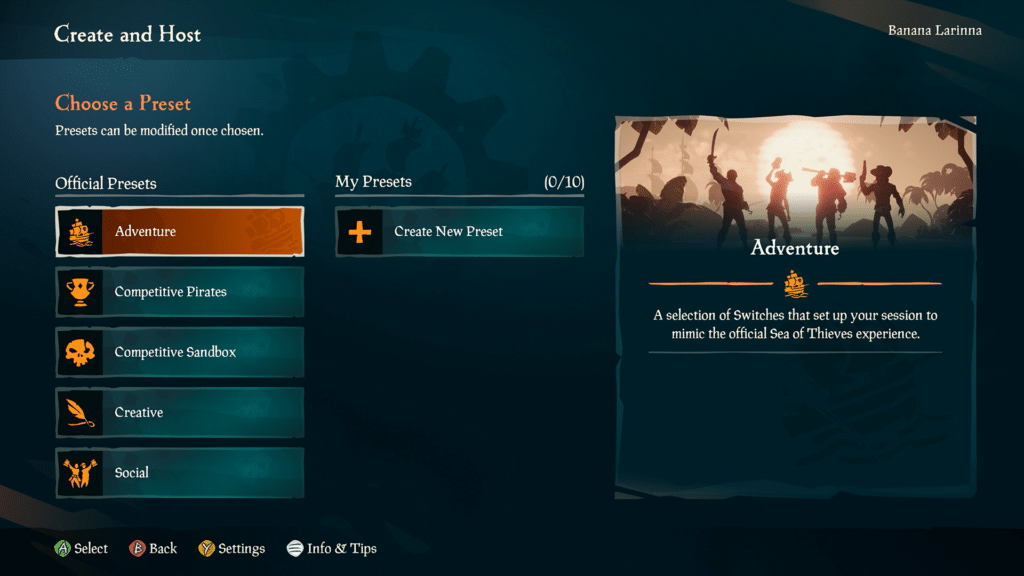
Creating and saving your own Preset
To build a Preset from scratch, select Create New Preset under My Presets. From there, you can dig into the Session Switches and tune everything to your liking, then save it as a named Preset you can reuse later. You can hold up to 10 custom Presets at a time.
Because any Preset is only a foundation, you can also load an official Preset, tweak its Switches, and save the result as a new custom Preset. That makes the official Presets a quick shortcut to a setup that’s already close to what you want.
Whichever Preset you start with, you can keep adjusting it from Session Setup using Edit Session Switches or swap to a different one entirely with Change Presets, without leaving your session setup.
Switches
Switches are parameters that you can use to modify various elements of your session, covering everything from whether players can damage each other to which World Events can appear.
You set Switches from Session Setup by selecting Edit Session Switches, which opens Custom Game Settings. Only the Session Owner can change Switches. They’re locked in once you set sail, so you’ll want everything how you like it before you start.
The Switch categories are Players, Ships, Emergent Creatures, Emergent World Events, Weather, Scoring, and Selling Treasure.
Player Switches control how pirates behave and fight in your session. You can do things like turn on infinite ammo, enable friendly fire, and adjust how long it takes to revive a downed pirate. You can also use Override Weapon Loadout to force every pirate to start with the same Primary and Secondary Weapon, which locks the Weapons Chest.
Ship Switches tweak the ships themselves. Here you can apply the unique Custom Seas crew liveries, set how stocked ships start with Ship Supplies, and change how far a sunk ship respawns with Ship Respawn Distance.
The Emergent Creatures and Emergent World Events categories let you decide what shows up in your world. You can switch individual creatures and World Events on or off, so only the threats and events you actually want will appear.
The Weather category holds the Storm switch, which turns the storm in your session on or off.
The Scoring category is where competitive play lives. The key Switch is Custom Scoring. Turning it on unlocks the rest of the scoring options, such as Time Limit, Score Limit, and how much each action rewards.
Finally, Selling Treasure controls where players can hand in treasure, letting you customize which Companies, Outposts, or NPCs will accept treasure in your session.
Custom Scoring and Silver
Custom Scoring can transform any Custom Seas session into a competitive one. Switch it on, and your session will track Silver, the points players and crews earn for completing the actions you choose to reward. Whoever banks the most Silver by the end, player or crew, wins!
What is Silver?
Silver is an exclusive currency in Custom Seas and is used to keep score. It isn’t like Gold or Doubloons, so you can’t spend it. It also doesn’t carry over to the next session. Silver exists purely to keep score within a single session, racking up as players and crews complete the scoring actions you’ve set up.
Turning on Custom Scoring
You can enable Scoring in Session Switches by turning on Custom Scoring. With Custom Scoring enabled, it unlocks the remaining scoring Switches and allows you to display a Scoreboard during your session.
Once Custom Scoring is on, you can shape how the match plays out:
- Time Limit: Sets a time limit, in seconds, that ends scoring once reached.
- Score Limit: Enables a score limit that ends the session when the first crew reaches it.
- Start Scoring on Session Start: If enabled, scoring begins when entering the session. If not, you must enable scoring manually.
- Scoring Method: Determines whether players or crews score silver.
- Display Game Objectives: Enables the display of game objectives within the scoreboard menu, along with their value in silver.
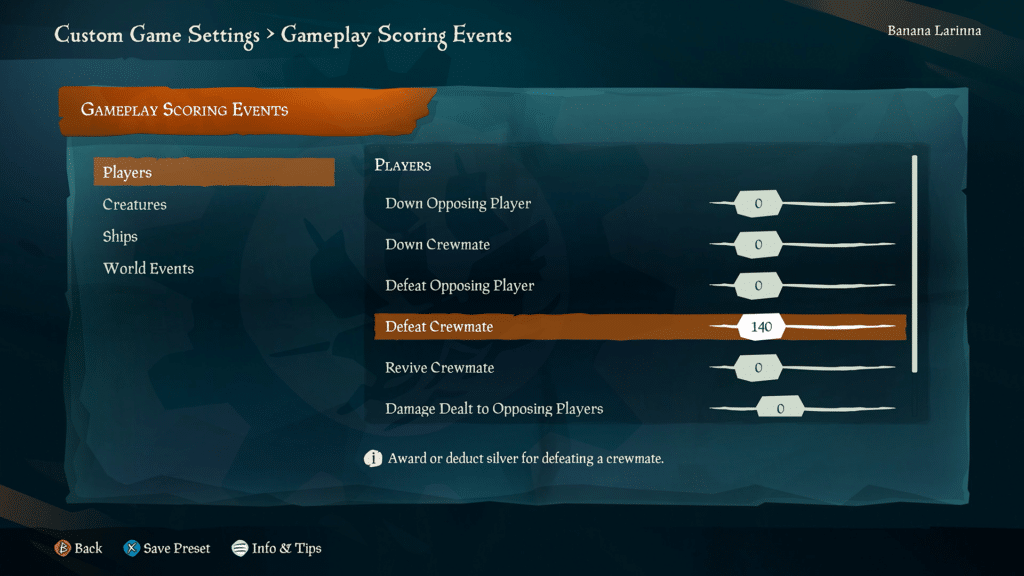
- Gameplay Scoring Events: Edit the gameplay scoring events such as downing opposing player, defeating Skeletons, and sinking ships.
- Treasure Items: Edit the silver values of miscellaneous treasures.
Setting Silver values
To create your custom competitive session, you’ll need to decide what actions earn Silver and how much they reward. Under Gameplay Scoring Events, you can set values for actions involving Players, Creatures, Ships, and World Events.
Player actions include downing and defeating opposing players, downing and defeating crewmates, reviving crewmates, and dealing damage to opposing players.
Creature actions cover defeating Skeletons, Phantoms, Ocean Crawlers, Sharks, Sirens, Krakens, and more.
World Event actions cover completing events like the Skeleton Fort, Fort of Fortune, Reaper Fortress, Skeleton Fleet, Ghost Fleet, and Ashen Winds. You can tune every value independently, so you decide exactly what your game rewards.
You can also set the value each treasure is when handed in. Under Treasure Items, the Treasure Chests section lets you assign Silver to every chest type, from Captain’s Chests to Reaper’s Chests. There’s also an Item Master Override to set one value across everything at once.
Scoreboards
The Scoreboard is the live ranking of every player or crew by the Silver they’ve accumulated, updating in real time as they earn it and crowning a winner at the end of the match.
As soon as scoring is active, a live Scoreboard appears in the top-right corner of your view. It shows your current Silver and rank at a glance, so you always know where you stand.
Once the session has started, you can open the Scoreboard from Game Options by selecting View Scoreboard or reach it through the Command Menu. Viewing the Scoreboard allows you to see the Leaderboard, which ranks every player or crew by Silver in three columns: Rank, Players, and Silver.
Alongside the rankings is a Game Objectives panel that lists exactly what everything is worth, from the Silver value of each scoring action to the value of every treasure item when handed in. It’s the quickest way for players to see how to climb the board. The Game Objectives panel only shows up if you’ve turned the Display Game Objectives switch on.
Scoreboard Controls
As the Session Owner, you can manage the scoring from Scoreboard Controls in the Command Menu. Before scoring begins, you’ll see Start Scoring, which kicks off the match on demand if you’ve turned off Start Scoring on Session Start.
Once scoring is running, you get the full set of controls:
- Pause Score: Pause scoring and the timer so no one can earn Silver until you resume.
- Reset All Silver: Resets every player or crew back to zero.
- End Scoring: End the match and bring up the final results.
When a match ends, the results are shown to everyone, highlighting the winner and giving your session a clear finish.
Crew Liveries
If you have a session with multiple crews, you’ll want to tell ships apart at a glance, and that’s what Crew Liveries are for. Custom Seas includes six distinct crew liveries, each with its own name, icon, and ship look, so every crew stands out on the water and on the Scoreboard.
The six crews are the Killer Whale, Silver Blade, Sea Dog, Freedom’s Flight, Admiral’s Duty, and Veil Seeker.
You can control the Crew Liveries with the Crew Liveries Switch in the Ship category, which is on by default. With it on, every ship will automatically have its crew’s livery applied. Turn it off, and ships keep their owners’ own customizations instead.
You’ll see each crew’s name and icon in the Edit Ships and Crews menu as you sort your roster, and those icons carry through to the Scoreboard so it’s always clear who’s who.
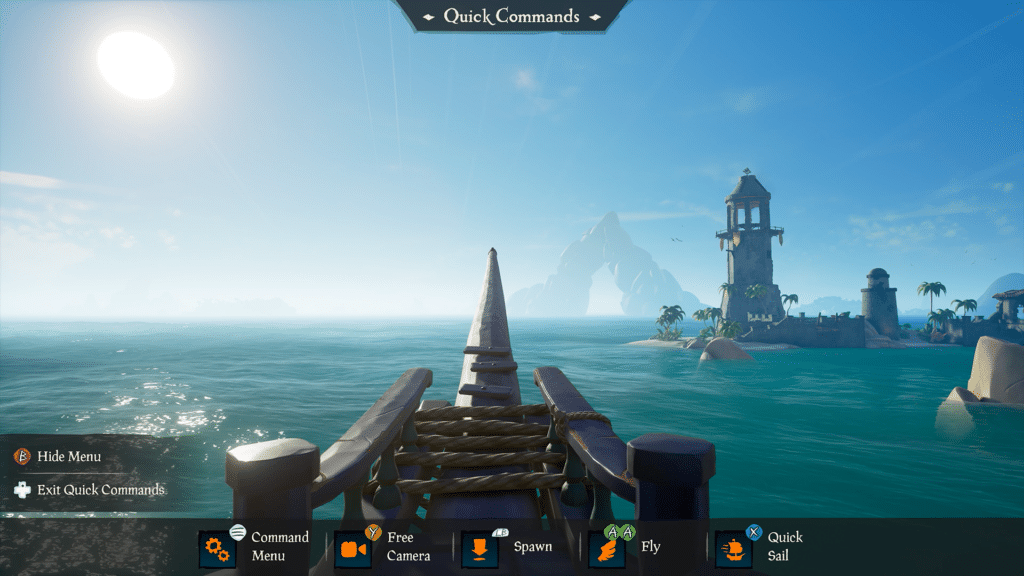
The Quick Commands Menu
Quick Commands allow you to access some of the most useful tools while sailing in your session, without diving into deeper menus. However, whether you can use it depends on your session role and permissions.
You can open Quick Commands during your session through your Item Radial. With your Item Radial open, you can select Open Quick Commands.
Quick Commands gives you fast access to:
- Command Menu: Jump straight to the Command Menu for more options
- Free Camera: Drop into the Free Camera to frame screenshots and cinematic moments.
- Spawn: Your saved shortcuts for spawning treasure and creatures.
- Fly: Lift off and fly freely around the Sea of Thieves. It’s the quickest way to get around an island or reposition for a shot, with variable speeds for fine or fast movement.
- Quick Sail: Take direct control of your ship to nudge it exactly where you want it, which is far easier than sailing it into place by hand. Like Fly, it has variable speeds.
While you’re in Quick Commands, you’re invulnerable to all damage. That lasts until you close the menu and return to normal play, so you can set things up without getting picked off.
The Command Menu
The Command Menu is the main control center for your Custom Seas session. It’s where the Session Owner and anyone with the appropriate permissions can manage the session and access the full suite of tools.
You can open it from Game Options or Quick Commands while you’re sailing.
Roster and Permissions is where you invite and manage the players in your session. From here, you can view session roles, change a player’s role, remove players, and report players.
Edit Ships and Crews manages your fleet and players without requiring you to return to setup. You can organize players into crews, change ship types, repair ships, remove ships, fast travel ships, and add a rowboat.
Spawn Treasures brings the sandbox’s loot to your fingertips. You can spawn any treasure item in the game, from Treasure Chests to Food, wherever you need it.
Spawn Creatures does the same for the world’s threats and wildlife, letting you summon creatures on demand, from Skeletons all the way up to a Kraken!
Scoreboards is your hub for a competitive match, where you start, pause, reset, and end scoring through the Scoreboard Controls covered in the Scoreboards section.
World Events lets you trigger Sea of Thieves world events on demand, choosing the event and which island it appears on.
World Settings hands you control over the environment. You can change the time of day and reposition the storm and fog wherever you want.
Fast Travel moves players and ships around the map in an instant, sending them to other players, ships, or islands across the world.

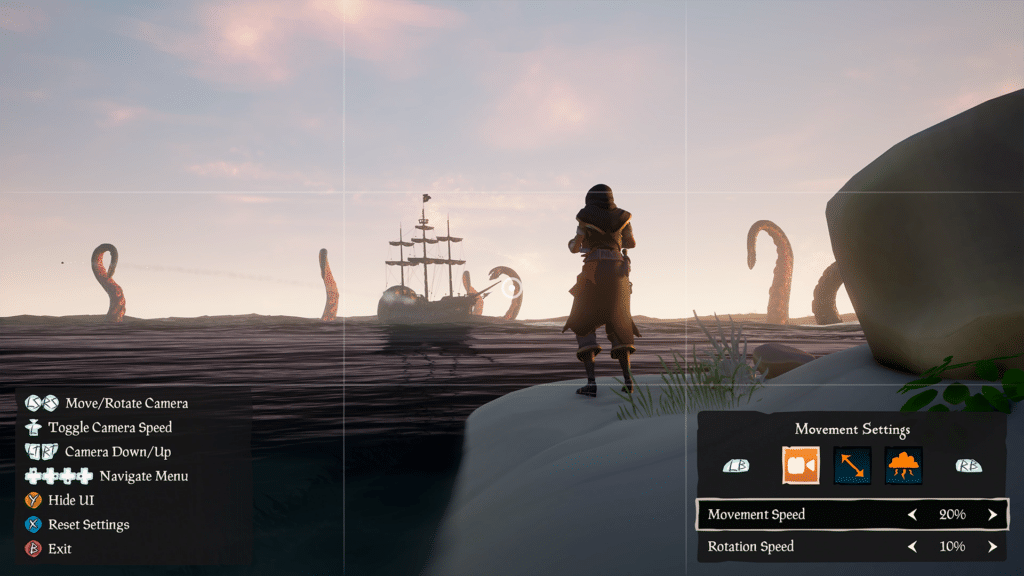
Free Camera
The Free Camera is an in-game camera with various settings, including movement speed, Field of View, and more. It is an independent view, separate from your pirate, that lets you roam around the world with a full set of controls for framing screenshots and shooting cinematic footage.
Like the rest of the in-game tools, access to the Free Camera depends on permissions. The Access Free Camera permission is set to Owner and Leader by default, but you can open it up so more of your session can use it. Once you have access, you enter it through the Quick Commands Menu.
Entering the Free Camera detaches you from your pirate so you can roam the area around your character. The Free Camera comes with a range of settings to dial in the perfect shot:
- Movement Settings: Adjust movement and rotation speed.
- Focal Settings: Control the field of view, depth of field, and bokeh size.
- World Settings: Hide your pirate, nameplates, and clouds.
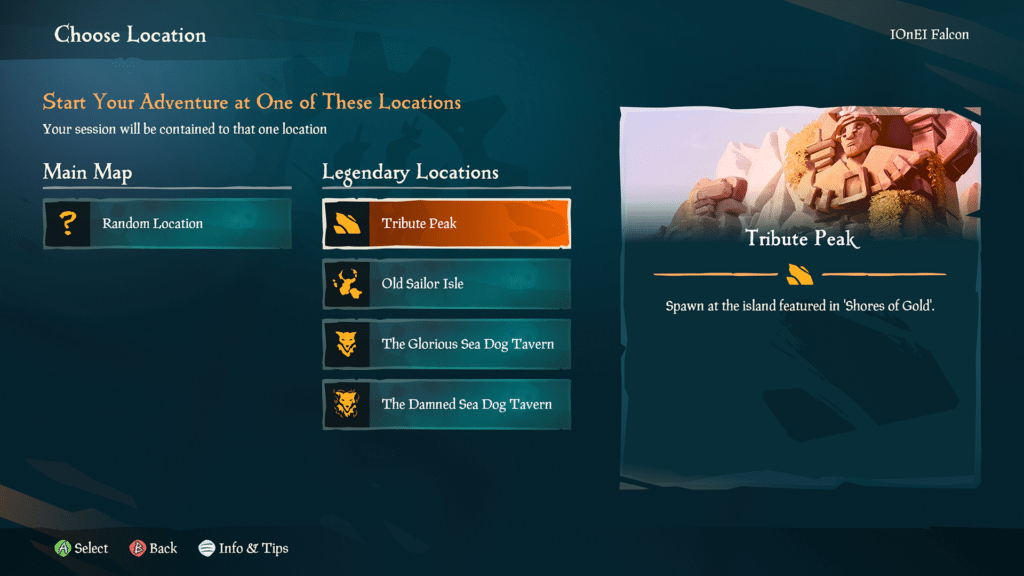
Legendary Locations
Legendary Locations are iconic, unreachable spots from Sea of Thieves that you can host your session at.
You can pick where your session takes place with the Choose Location option in Session Setup. The screen splits into two choices: the Main Map and the Legendary Locations.
Under Main Map, you’ll find Random Location, which spawns your crews at a random Outpost in the standard Sea of Thieves world, just like a normal Adventure session.
The Legendary Locations you can select are:
- Tribute Peak: Spawn at the island featured in ‘Shores of Gold’.
- Old Sailor Isle: Spawn at the island featured in the Maiden Voyage.
- The Glorious Sea Dog Tavern: Spawn at the Glorious Sea Dog Tavern (includes access to the Tavern interior).
- The Damned Sea Dog Tavern: Spawn at the Damned Sea Dog Tavern in the Sea of the Damned.
Each Legendary Location has the Devil’s Shroud around it to ensure that players and ships don’t travel too far away!


2 thoughts on “Sea of Thieves: Custom Seas”
Tried to check how to enable the camera for any player (since it’s in the listed options it should be avilable) but it seems we can’t use the camera mode without also having access to the command panels, which is a bit of a bummer.
There is no hotkey we found to use it, it would be a great thing to add as an easily accessed option for everyone.
It is also impossible to access the camera mode when sitting down or holding on elements such as ladders or borders.
No one asked for this! We want a private server due to safer seas players being punished to what higher seas have with the pvp im sorry use your brains and simplify it. Sea of thieves safer seas is now 100% gold no? Then lift it what us non pvp players have against pvp is unfair! Put higher seas with modified gold amounts etc but give safer seas all that higher seas has except the x on gold etc for higher seas. This makes it fair for non pvp players we cant grind due to sad cunts on higher seas therfore your punishing us plus forcing us to pvp to only want to grind and not pvp. Saferseas is limited cant emissary cant this cant that its bollocks! Make seas of thieves safer seas like high seas without bonuses on taking the risk. Keep safer on 100% gold no boots only through emissary where we can grind safely and not forced. AND RARE PVPERS WILL PVP THEY WONT LEAVE FOR SAFER SEAS BECAUSE THEY WANT PVP! NON PVP WONT GO ON HIGH SEAS CAUSE ITS A JOKE!